Use wine boxes for chest freezer management.
One of the hardest things to manage when you use chest freezers for storing meat for sale is how to handle the depths of the freezer and not lose track of what you have. I’ve discovered a few tricks over the years that are applicable to anyone with a chest freezer.
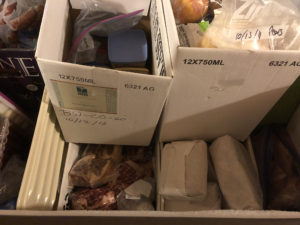
My secret is wine boxes
These boxes are sturdy and deep but not too heavy when filled with frozen meat. How many you will need depends n the size of your freezer but you can get 2 layers deep and usually 3-6 in each layer for most chest freezers.
To organize your freezer collect several nice clean wine boxes. Take out the bottle separating insert and push the flaps down inside. This is important and will become obvious why later.
Take everything out of your freezer and place in coolers. Defrost the freezer if necessary. It’s a lot easier to start with a freezer with no ice buildup in it.
Place your first layer of empty wine boxes in the freezer. If you ever played Tetris then you know it may take a bit to get them all in. If your freezer is like mine you cannot get them in without leaving gaps. Gaps are bad, for maximum efficiency and storage capacity you need the bottom to be completely filled with frozen items. If you end up with gaps then use the boxes to make slightly larger sections by placing them in a staggered pattern leaving some holes.
Take stock of what you usually keep in your freezer and what you want to add.
For my freezers of for sale meats I have a number of different cuts from our sheep.
In my home freezer I typically have mutton and lamb, chicken, beef, venison, pork, prepared foods, vegetables, fruits, ice cream, cookies, breads, stock or broth and sausages. My prepared foods can be home made pizzas ready to microwave, smoked meats ready for tacos or curry, ground meat and onion ready to go into spaghetti sauce or chili, stews or soups, prepared curry sauce, spaghetti sauce and more. I also freeze leftovers that I make on purpose. I will cook a large batch of something and freeze the extra to save time later. This is especially important for us during lambing when we need hot high protein meals I can fix in the microwave in 15 minutes or less.
Now comes the fun part, loading your freezer for quick access to everything.
Pick one of the boxes or section in the bottom and pull out all the meat from one type of animal from you coolers and place it in this box. For example I have a box that has nothing but beef cuts. Another box contains just chicken. I may have a box for just pork when we have bought a half of a pig and I always have a box for sheep meats. I keep one for frozen bagels and other breads. Once you’ve placed all the common items in boxes or open spaces on the bottom then start your next layer. Items in this layer should be the ones you will be using several times a week.
I keep one box for cookies and ice cream and fruits. One box has packs of frozen vegetables. Save one box for prepared meals that are ready to heat up for a quick meal. Lastly save one box for those items you need to use up soon. The eat now box.
If you have more of one type of item than will fit in one box look at whether one of your open spaces is a bit larger and use that area. Or separate the meat by cut and place the boxes on top of each other. When we raise a beef we usually keep a half for us. I end up with one box of hamburger and several boxes of other cuts. I separate out the roasts from the steaks so it’s easy to find what I want. A whole lamb will fit into a wine box if you get some of the items deboned. I keep one box of various sausages because of how I plan meals.
For my for sale freezers I separate the meat by the cut so I have boxes for racks, leg roasts, shoulder roasts, chops, stew meat, ground and so on.
Some people like to keep a detailed inventory of how much they have but I’ve always found it too much hassle to keep current. For me just having the items by species for most meat and by type for other items allows me to prepare varied meals each week. I do try to keep a bit of a map of what is where but that is all I do.
Once you start this you’ll find that the advantage of putting the flaps on the inside. When you need to get to the bottom layer you can slide your hands down the inside and pull the entire box up by the flaps. It keeps the items contained and makes it easy get anything no matter where it is.
Have fun with your newly organized freezer as you prepare delicious healthy meals from your stored food.